3D textures for WebGL Tiles
In this post
- I look at using 3D textures to store 2D pixel art tiles,
- I use another texture to define a map,
- I use a Framebuffer to allow editing of this map
Demo
Click to change tile, scroll to zoom, right click & drag to pan
3D Textures
See also:
MDN Link
OpenGL Link
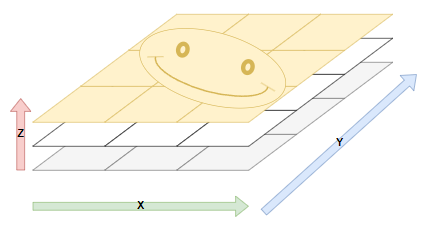
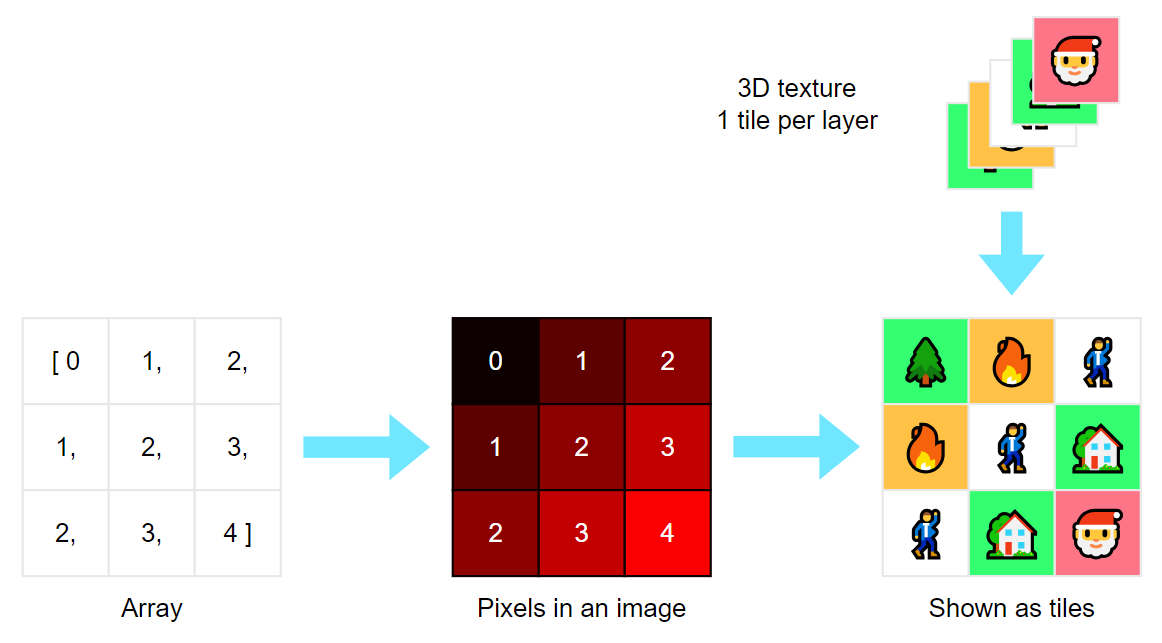
In WebGL 2 you can create a 3D texture. This is like a 2d texture (with a UV/XY axis) but with an additional Z component. We will organise our tiles so there's one tile per Z value (or per-layer).
The texture setup itself it's almost the same as 2D:
const texture = gl.createTexture();
gl.bindTexture(gl.TEXTURE_3D, texture);
gl.texStorage3D(gl.TEXTURE_3D, 1, gl.RGBA8, layerWidth, layerHeight, layerDepth);
gl.pixelStorei(gl.UNPACK_PREMULTIPLY_ALPHA_WEBGL, 0);
gl.pixelStorei(gl.UNPACK_FLIP_Y_WEBGL, 0); // Not sure if I need to be explicit about this one
gl.texParameteri(gl.TEXTURE_3D, gl.TEXTURE_MAG_FILTER, gl.NEAREST);
gl.texParameteri(gl.TEXTURE_3D, gl.TEXTURE_MIN_FILTER, gl.NEAREST);
Then we make a temporary canvas and draw our image to it
const canvas = document.createElement('canvas');
canvas.width = layerWidth;
canvas.height = layerHeight;
const ctx = canvas.getContext('2d', { willReadFrequently: true }) as CanvasRenderingContext2D;
ctx.drawImage(img, 0, 0); // img is our loaded HTMLImageElement
Then we sample regions of the image and add them to the texture
for (let i = 0; i < layerDepth; i++) {
    const x = i % cols;
    const y = Math.floor(i / rows);
    const data = ctx.getImageData(x * layerWidth, y * layerHeight, layerWidth, layerHeight).data;
    gl.texSubImage3D(gl.TEXTURE_3D, 0,
        0, 0, i,
        layerWidth, layerHeight, 1,
        gl.RGBA, gl.UNSIGNED_BYTE,
        data
    );
}
You could also draw and sample each tile one by one. This is useful if the tiles come from multiple files, if they're generated by drawing on the 2d canvas, or if they're just huge.
Using a texture for the map
We'll use a single plane to draw our tiles, that should be pretty efficient!
Imagine a 2D texture as an array of numbers, basically tile indexes
I'll skip right to the fragment shader here, assuming we've already loaded a 2D texture.
#version 300 es

precision mediump float;
precision mediump sampler3D;

uniform sampler2D uTex; // our 2D texture
uniform sampler3D uTex2; // our 3D tiles texture
uniform vec2 uScale; // a 2d scale vector

out vec4 o_color;

void main(void)
{
  // Work out where on the texture to sample
  vec2 uv = gl_FragCoord.xy * uScale;
  vec4 rgba = texture(uTex, uv);
  // get our image index (0-1) (using our red channel here)
  float t = rgba.r;
  // 32.0 is the size of the 2D texture in pixels
  // The Y coord is flipped
  o_color = texture(uTex2, vec3(uv * vec2(32.0, -32.0), t));
}
The vertex shader is relatively boring, and still contains more in and uniforms than you need here (I just keep it pretty generic here for my own purposes)
#version 300 es

in vec3 aPos;
in vec3 aNorm;
in vec2 aTex;

uniform mat4 uCameraMat;
uniform mat4 uWorldMat;

void main(void)
{
    gl_Position = uCameraMat * (uWorldMat * vec4(aPos, 1.0));
}
Using a Framebuffer so we can edit the map
Here's my standard framebuffer code. We'll create one of these
export type Fbo = {
    tex: WebGLTexture | null,
    fb: WebGLFramebuffer | null,
    width: number,
    height: number
};

export function createFbo(gl: WebGL2RenderingContext, width: number, height: number): Fbo {
    // https://webglfundamentals.org/webgl/lessons/webgl-render-to-texture.html
    const tex = gl.createTexture();
    gl.bindTexture(gl.TEXTURE_2D, tex);
    gl.texImage2D(gl.TEXTURE_2D, 0, gl.RGBA, width, height, 0, gl.RGBA, gl.UNSIGNED_BYTE, null);
    gl.texParameteri(gl.TEXTURE_2D, gl.TEXTURE_MIN_FILTER, gl.NEAREST);
    gl.texParameteri(gl.TEXTURE_2D, gl.TEXTURE_MAG_FILTER, gl.NEAREST);
    gl.texParameteri(gl.TEXTURE_2D, gl.TEXTURE_WRAP_S, gl.REPEAT);
    gl.texParameteri(gl.TEXTURE_2D, gl.TEXTURE_WRAP_T, gl.REPEAT);

    // Create depth buffer
    const depthBuffer = gl.createRenderbuffer();
    gl.bindRenderbuffer(gl.RENDERBUFFER, depthBuffer);
    gl.renderbufferStorage(gl.RENDERBUFFER, gl.DEPTH_COMPONENT16, width, height);

    // Create and bind the framebuffer
    const fb = gl.createFramebuffer();
    gl.bindFramebuffer(gl.FRAMEBUFFER, fb);

    // attach the texture as the first color attachment
    gl.framebufferTexture2D(gl.FRAMEBUFFER, gl.COLOR_ATTACHMENT0, gl.TEXTURE_2D, tex, 0);
    gl.framebufferRenderbuffer(gl.FRAMEBUFFER, gl.DEPTH_ATTACHMENT, gl.RENDERBUFFER, depthBuffer);
    return { tex, fb, width, height };
}
Bind to it instead of our original map texture
gl.activeTexture(gl.TEXTURE0);
gl.bindTexture(gl.TEXTURE_2D, R.map.tex);
And at the start of my render loop, I have this logic to draw to the FBO
if(mouseClick){
    mouseClick = false;
    gl.bindTexture(gl.TEXTURE_2D, map.tex); // bind to our map texture, from the Framebuffer
    const pix = mousePosToTile(mousePos);
    const pixels = new Uint8Array([255 * Math.random(), 0, 0, 255]); // A pixel with a random red value
    gl.texSubImage2D(gl.TEXTURE_2D, 0, pix[0],pix[1], 1, 1, gl.RGBA, gl.UNSIGNED_BYTE, pixels);
    gl.bindTexture(gl.TEXTURE_2D, null);
}